Collaborating for the First Time
Preparing Your Physical Environment
Upgrade Your Network Connectivity
Whether you are using a videoconferencing tool or an XR collaboration tool, you will want to ensure you have a stable and reliable Internet connection. A poor internet connection is likely to interfere with the experience, or even render it entirely useless.
You can test your connection speed via various tools available online.
Videoconferencing Tool Requirements
Even though the focus of this publication is on XR collaboration, we know that some of you will be thinking about the requirements for videoconferencing tools so we are providing that information too.
Minimum Bandwidth
If you are using a videoconferencing tool, you will need an internet connection – broadband wired or wireless (3G or 4G/LTE). Minimum bandwidth is 600kbps (up/down) and recommended is 1.5 Mbps (up/down). We generally recommend an average of an additional 60 to 150 kbps for VoIP traffic.
Optimum bandwidth for video conferencing:
- High Definition Video: 2.5 Mbps (Receive) and 3.0 Mbps (Send)
- High Quality Video: 1.0 Mbps (Receive) and 1.5 Mbps (Send)
- Standard Quality Video: 0.5 Mbps (Receive) and 0.5 Mbps (Send)
The actual bandwidth requirements and utilization will vary based on multiple factors, including:
- The make and model of the web camera used.
- The resolution setting of the camera.
- The frames per second (FPS) setting.
- How many cameras are activated in the meeting.
- How many active cameras are on the same network.
- The bandwidth utilization of other meeting activities, such as screen or desktop sharing, Voice over IP (VOIP), etc.
- Whether or not the PC in question is transmitting video, or only receiving.
Maximum Latency
Issues begin when there is interference within the network that could cause a delay in the transmission of data, which could come in the form of latency, jitter and packet loss.
Acceptable latency for video conferencing is less than 300 milliseconds round trip from one endpoint to another before a noticeable delay – between the speaker and the receipt of their words by the far end participants – is registered. The degree of acceptable latency is influenced by the type of the videoconference. It is also desired to have less than 40 ms jitter and 1% or less packet loss.
XR Collaboration Tool Requirements
Minimum Bandwidth
If you are using a XR collaboration tool, you will need a good internet connection – broadband wired or wireless (4G/5G). Optimum bandwidth is 1.5 Mbps (up/down). We generally recommend an average of an additional 60 to 150 kbps for VoIP traffic.
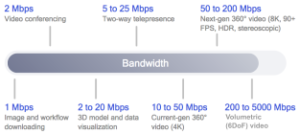
Recommended Bandwidth and Latency for XR Collaboration
Surprisingly, the bandwidth requirements for XR collaboration tools are generally much lower than for videoconferencing tools! This is because most of the content is preloaded before you enter a collaboration “room” or session. A higher bandwidth will result in a faster “startup” time getting into a session. Once a session is started, bandwidth is primarily consumed by voice, annotation, movement tracking, or other user avatars and content (2D, 3D) insertion and sharing. Of course, if you start sharing your computer screen into your XR collaboration tool session, you will need the extra bandwidth for the video streams (see the “Videoconferencing Tool Requirements” section for details). Overall if you have 10 Mbps down you should be able to handle anything.
What is more important than bandwidth for XR is the latency of your connection.
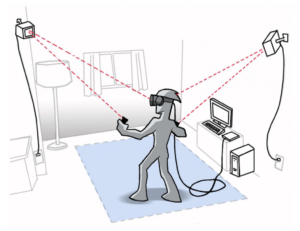
Planning a Standing Space
If you are using a VR device and plan to be standing and moving, you will typically need a clear rectangular space in the real world to move around in. Depending on the VR device you are using, you may need to set up tracking sensors (often referred to as “lighthouses”) which are used to track your physical movements and reflect those in the virtual environment. Newer devices often have those sensors built into the device itself, which makes this initial setup a much more straightforward process.
Typically, we recommend a safe area in excess of 3 feet by 3 feet (1 meter by 1 meter). However, some tools will work best with a minimum safe area of 5 feet by 5 feet (1.5 meters by 1.5 meters). The useful “guardian” feature of the Oculus Quest headset streamlines this process by giving users the ability to establish a safe area within any room, which the device will remember and recognize for the duration of the session.
Planning a Sitting Space
If you are going to be engaged in lengthy XR collaboration sessions or are unable to stand, it might be preferable to set up your device while sitting down. In such cases, it is recommended to use a seat which can swivel to reduce the amount of strain when looking around at different areas of your XR environment.
Prescription Inserts
While some devices, such as the HoloLens, are designed to let users wear spectacles underneath the visor, some HMDs are not compatible with prescription glasses or at least don’t allow for room to wear them comfortably. Should you not want to switch to wearing contact lenses when using XR, it is possible to order prescription inserts for various devices such as the Magic Leap 1 or Nreal Light. These usually cost in the range of US $100-250 each but some device makers are offering developer kits with several lenses.
The quality of your voice and the reduction or removal of background noise is very important in your XR collaboration experience. We recommend that you select a good noise-cancelling, unidirectional microphone and if you will wear it, it should be something that feels comfortable over long periods of time. Some people prefer boom or desktop stand microphones.
Preparing Your XR Environment
Picking a Username
Since you are likely to be using XR collaboration tools in a professional setting, it is a good idea to ensure you select a username for your XR tool that makes you readily identifiable (your first name + last name initial is usually a good approach). See the section titled “Setting Up XR Ecosystem Accounts” for more details.
Avatar Planning
Design an avatar that is easily identifiable as you by others. Look at using your own personal face image and/or customize your clothing style where such options are available. Some tools have more sophisticated avatar personalization options than others, so (as per above) you should allow for a learning curve and budget some time to familiarize yourself with the tools available. Plan at least 30-60 minutes for your first time experience to access tutorials, and learn how to navigate the menus and other features. See the section titled “Avatars” for more details.
Don’t Overdo It
As people get used to new XR devices, they may find it very natural and enjoy the experience, or they might not have a tolerance for more than 20–30 minutes at a time (this is especially true with VR, where some people even experience some form of motion sickness). Although “simulator sickness” is more common in content such as movement-intensive games, we do recommend keeping VR meetings to no more than 30 minutes until you get comfortable and then working up to longer sessions.